
Audio editing software often seem daunting and really hard to crack. When someone thinks about how to edit podcast, they think of the squiggly waves like an EKG Machine, thousands of icons in and around, not to mention the blue-red portions that seem to be flashing in and out. Clearly, this is the job of some expert sound editor, right? Wrong!
There are audio editing software out there that aren’t that complicated as you think they are. In fact, the process of podcast editing is rather quite simple and fun! Once you get the hang of editing software, podcast creation will become easy. If you need any help with recording a podcast, this guide will help you.
Editing Podcast on the Web
To get started, you might want to dabble with a few online software that let you edit without having to download the software on your local system. These, as you would have guessed, will help you get the hang of basic editing, including background noise reduction and audio trimming. Here are some such interesting websites that can help you with your podcast editing with a click of a button.
- Removing background noise: Auphonic, Twistedwave
- Trim audio and add intro & outro music: Hubhopper Studio Editor, Sodaphonic, Bearaudiotool
How do I add music/sound effects to my podcast?
To add music/sound effects to your podcast, we first must find music that is copyright-free. The performing arts industry works on licensing, so be careful not to use somebody else’s work without due credit to them, sometimes through attribution, other times monetarily.
To start off, we can simply use music that does not have copyrights. One such source for this is the‘Youtube Audio Library’, which has a variety of amazing music and sound effects, and is always updated. Besides, you’ll find they can also be filtered according to genre, mood, instruments etc. to help you find that best piece of music that goes best with your podcast!
Online Audio Editing using Hubhopper Studio
You can use the free online audio editor that Hubhopper studio provides to edit your podcast. A simple, yet a useful tool in performing tasks like adding music to your podcast, adding fade in & out effects and trimming out parts from your audio. Sign up on Hubhopper studio today to get started with your very own podcast.
Adding Music/Sound effect using Hubhopper Studio
The Hubhopper audio editor can help you with the task of adding background music, and adding introduction and closing tunes to your podcast. The online tool is completely available for free for Hubhopper Studio Editor users. Check out the video below to see how simple the tool is.
Yes, this software is free, easy to use and gets the job done beautifully through its versatile functionalities and intuitive interface. Click here to use the Hubhopper Studio Editor
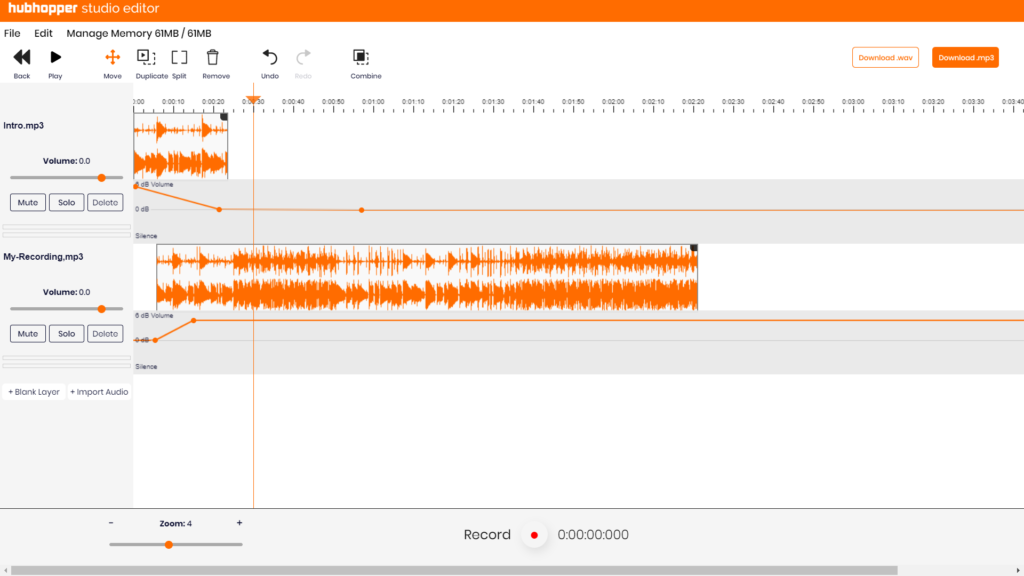
Let’s go through the basics on how to use the Hubhopper Studio Editor to edit your podcast and make it sound world-class!
To begin editing your audio, you must first ‘import’ your audio file to Hubhopper Studio Editor. To do this, go to the left side and click on ‘file’, then click on ‘import audio’. Choose your audio file from its directory and there you go!
Basic Tools

This is the ‘split tool’. This will allow you to choose a point in time in your audio file where you can cut your audio file into two sections. This is the numero uno tool to remember. This tool very important is splitting specific parts which you wish to work on, or edit out.

This is the ‘moving tool’. This tool will allow you to move your audio file (whole) left or right of the timeline. This becomes important when you wish to stitch different parts of audio together in series. One such use case would be to play the intro music first before starting with your podcast. You just have to simply move your audio file to the right to the same extent as the length of your intro jingle (away from where the timeline begins) and simply add the music in there.

This is the ‘remove tool’. This tool will allow you to remove any section of your audio file. This is typically used with the split tool where you can first split the section you want to remove, select the remove tool and finally select the section you want to remove. This is very useful in cases where you make a mistake while recording.

This is the ‘duplicate tool’. With this tool, you can make a copy of any section in your project. This can be used for duplicating sound effects to use throughout your podcast.
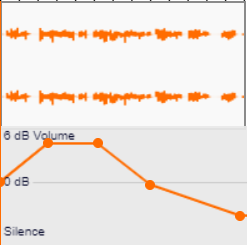
This is the ‘pinch tool’. This tool is used to control the volume of your audio file. You can simply pinch down the volume of a specific part in your audio file. We will get into this later in the blog.
If your recording has background noise that you don’t want in your podcast, you can use Audacity to remove the background noise.
How to Remove Background Noise using Audacity
One of the first, yet the most daunting tasks a podcaster is faced with is the removal of background noise from their audio files. You can sit in the most silent corner of your house to record, but the microphone does end up picking some of the ambient noise. But fear not! Here is how simple removing it is using Audacity:
Step 1
Use the selection tool and select the part where you are not speaking. Why? Because that is where exists the ‘background noise’! Once selected, go to ‘Effect’ (top bar) and choose ‘Noise Reduction’ in the drop down.
Once you click on it, a tab will open. Select ‘Get Noise profile’. This is to tell the software, “Hey man, that’s the background noise in my audio file.” Once the software identifies the ‘Noise profile’. Click ‘OK’.
Press ‘Ctrl + A’/ ‘⌘+A’ on your keyboard (Select All) and open ‘Noise Reduction’ again, then hit ‘OK’. (Do not change settings)
Step 2
Press ‘Ctrl + A’/ ‘⌘+A’ on your keyboard (Select All). Go to the top bar and choose ‘Compression’ from the dropdown and simply click ‘OK’. (Do not change settings)
Step 3
Press ‘Ctrl + A’/ ‘⌘+A’ on your keyboard (Select All). Go to the top bar and choose ‘Equalization’ from the dropdown and simply click ‘OK’. (Do not change the settings)
Step 4
Press ‘Ctrl + A’/ ‘⌘+A’ on your keyboard (Select All). Go to the top bar and choose ‘Normalize’ from the dropdown and simply click ‘OK’. (Do not change settings)
And voila! Your audio file will now sound crisper and without any background noise. As to why these effects specifically are able to help make your audio sound better, is a discussion best kept for another day.
This article is intended to keep things as simple as possible.These are the basics that will propel your podcast into a high quality audio show. Hubhopper Studio provides an online audio editor within its platform itself! A platform where you can host, edit and distribute your podcast for free. Upload your file and give it a try!